Select the station and check the building highlight: blue means cargo access, green means passenger access, and white means both. Passengers also need a usable walking route; being inside the radius is not the entire test.
Jump to a section
Check these in order
Tick each check as you go. Ticks reset when you reload.
Coverage colour key
- Blue
- Cargo access
- Green
- Passenger access
- White
- Both types of access
See what to inspect
Check the target building, not just the circle
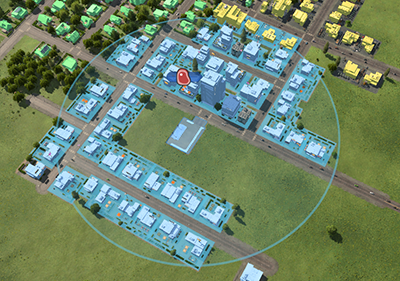
Source image; not a SimGrove play-test. Interface may differ by version or platform.
- Locate — Find the building you want to serve inside the blue radius.
- Inspect — The pictured blue buildings indicate cargo access. This picture does not demonstrate every passenger-path condition.
- Next check — Compare the highlight on your own target building before and after adjusting the station location.
A nearby building is not served
The situation. Suppose the station looks close enough, but the building you intended to serve does not show the expected access highlight.
Choose the target
Select one building to diagnose. Keep its position and the station visible in the same view.
Compare a small change
In a test save, compare another station position. For passenger service, inspect the walking connection as well.
Recheck the same building
Select the station again. Compare the building highlight rather than the apparent size of the new layout.
What would count as a useful result?
The intended access highlight is your coverage check. If it appears but transport still fails, continue with the line and loading checks.
Evidence to keep: Keep before and after coverage views at the same zoom. This is a suggested test, not a measured best layout.
Read the coverage colours
Cargo uses the catchment radius. Passenger access also requires a valid walking route without a substantial detour. Use the building highlight to check your intended connection before changing a station.
Do not confuse coverage with throughput
A covered building answers one question: whether it can exchange passengers or goods through the station under the documented rules. It does not establish how well your whole network will perform. Keep the coverage check separate from later capacity and operating decisions.
Investigate loading separately
The manual explains that loading depends on the vehicle, platform and stored goods. A specialised cargo platform can help matching cargo and penalise other types. Before redesigning a station, record what it is serving and compare that with the chosen specialisation.
Sources & review notes
Reviewed against the linked documentation on 3 November 2026. This is a source-based guide, not an in-game test report. Planning and diagnostic suggestions are SimGrove’s editorial recommendations. Features may change with updates.
Something changed? Send a correction →