Find the stopped train and follow the route it wants to take. Waiting before a junction, showing a line warning, and waiting for cargo are different situations. Let’s work on one path at a time so you can see what each change actually does.
Jump to a section
Start with these three things
Tick each check as you go. Ticks reset when you reload.
Which of these sounds like your save?
Pick the situation that feels familiar. Let’s follow that thread before changing the rest of the network.
Stopped before a signal
Try this next: Find the next train or junction on the intended route. Record where the waiting train would go, not just the colour of the signal. Compare that route with the other train’s position.
Then watch for this: Watch whether the waiting train proceeds after the other service clears. A single screenshot of a red signal cannot distinguish normal waiting from a persistent blockage.
A line warning appeared after track changes
Try this next: Start with the most recent edit: a switch, signal direction or terminal choice. Read the warning for the affected segment. Avoid changing several nearby junctions at once.
Then watch for this: Recheck the warning and follow the same train through the section. A disappearing warning is useful, but the full journey is the operational check.
The train enters the station but cannot leave
Try this next: Treat the exit as a separate investigation. Write down the next stop and trace the outbound route. Check whether the train is loading before assuming its exit is blocked.
Then watch for this: Observe departure and arrival at the next stop. If it only moves a short distance and stops again, your test is not complete.
An empty platform is being ignored
Try this next: Compare the actual approach to the alternate-platform case below. Identify where the train must choose its branch and whether that branch still exists ahead of its decision point.
Then watch for this: Observe an approach while the primary platform is occupied. Record which terminal the train uses and whether it can leave afterwards.
Case 1: two trains and a passing loop
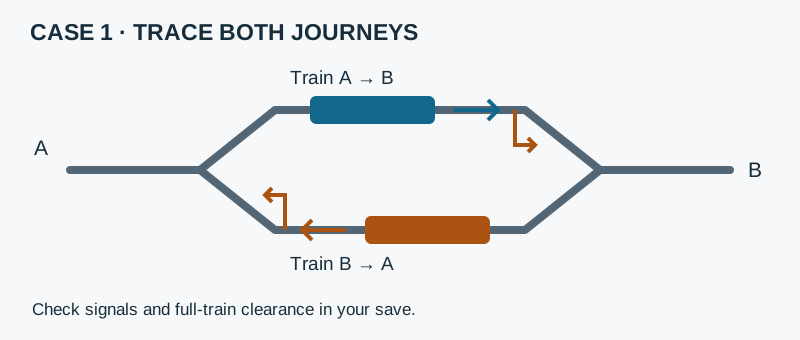
Illustrative setup: stations A and B share a single-track route with a two-track passing loop between them. One train waits at each end. Before adding more track, compare this situation with the official passing-siding example linked below.
Our test procedure: record both intended paths; compare the signals at the exits of the two loop tracks, facing each train’s intended direction; leave room for the complete train between the junctions. In a copy of the save, test the missing signal arrangement illustrated by the official example. Then watch both trains enter, clear the loop and reach opposite destinations. One departing train alone is not a successful two-train test.
A before-and-after screenshot can help you spot the difference. If it still doesn’t work, that’s useful too: you’ve narrowed down where to look next.
Read the two layouts
Original SimGrove schematics. Not game screenshots, not to scale, and not complete construction blueprints. Arrows show the intended journey.
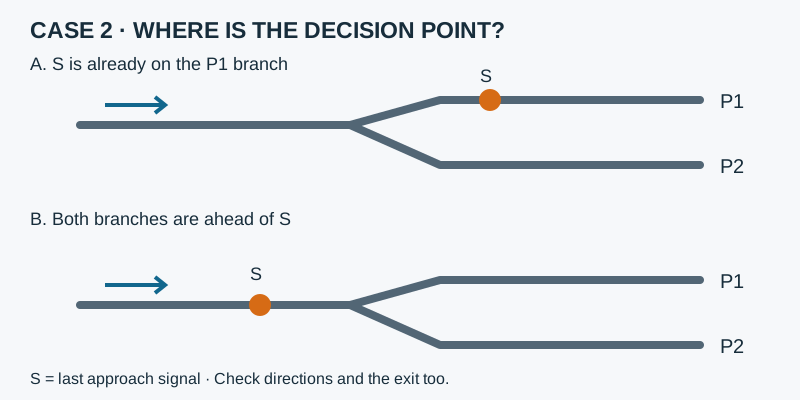
Case 2: the second platform is empty, but unreachable
Picture this. Imagine this: the approach divides into platforms P1 and P2, but the last approach signal is already on the P1 branch. You enable P2 and expect the arriving train to use it.
Mark the decision point
Find the final approach signal and draw the intended path from that point to P2. Compare it with the diagram below. If the branch to P2 is already behind the decision point, the proposed alternative needs review.
Test a targeted correction
In a separate save, review the signal position relative to the split or disable an unreachable alternative while diagnosing. Check the resulting paths before resuming traffic. Do not copy the schematic’s spacing as a construction measurement.
Test both arrival and exit
Observe a new approach with P1 occupied, then follow the train after it uses the available terminal. Also observe the train occupying P1; solving one arrival should not conceal a blocked departure.
What you’re looking for
A useful result is an observed approach to an enabled reachable terminal, followed by departure to the next stop. This is a proposed test, not a claim that we ran it.
Worth keeping handy: Keep the approach signal, split, terminal selections and full train visible. Use the official line manual to compare the decision point.
Read these rules before changing signals
The official signalling guide describes path reservations and warns that a train waiting too close to a junction can obstruct another route. Allow space for the entire longest train beyond the junction. Its passing-siding example needs signals to separate competing reservations; stations do not automatically act as signals. One-way signals cannot be passed from behind.
Check the decision point for alternative platforms
According to the line manual, a train chooses among enabled alternatives at the last signal before the station. Each enabled terminal must be reachable from there. Inspect both arrival and departure warnings. A free platform beyond an inaccessible switch is not a usable alternative.
Before moving signals, check the loading rule
At a platform, inspect the stop’s departure setting. Full-load rules can deliberately hold the train. On a test copy, compare with Load if available, then follow the next journey. Departure after this change supports a loading-wait explanation; it does not prove that all track connections work.
Source limitation and what to record
Reviewed 5 November 2026. The Transport Fever 3 signalling page still names Transport Fever 2 in one paragraph. We use its published layout examples as reference, not as proof of personally tested behaviour in every build. Keep your platform, game version, mods, exact warning and a view of the whole train with your report. If your game behaves differently, send that evidence through our corrections page.
Player Stories & Experiences: Explore four shared experiences →
Sources & a note on this guide
Reviewed against the linked documentation on 5 November 2026. We used the linked sources to build this walkthrough. The examples are suggested exercises, not records of our own play-testing. Your version, mods or setup may behave differently; a screenshot and a game version help us review corrections.
Does it work differently in your save? Let us know →